
If you follow my blog or FB, you know that I've been CRAZY into buntings lately... I am making them for every theme, holiday, pattern, you name it, I'm doing it! If you've purchased any of the sets that have all letters of the alphabet in capital and lowercase, I just added an editable PowerPoint to those packs so you can do your own fonts or customize which pennants you use! And if you want to check them out, click HERE!
After I posted these pics of my holiday banners...


Check out this pack on TpT!
I got a few e-mails and blog comments about my laminator, assembling these guys, and how I'm storing them.
So here are the answers!
This is my laminator:

Find it on Amazon
It even came with stickers so I could decorate it! I buy my thermal refill pouches on Amazon too. Last week I ran out and bought some at Wal-Mart and it was $15 for 50. Yikes! I buy these on Amazon and it's $10 for 100! I've purchased several batches of this brand and they've all been great for me! I have some coming this week and I can't wait to laminate some more.
I also got asked how I assembled these bunting banners...
I just had some random scrapbooking stuff here at home so, I punched 2 holes in the top corner of each pennant and then used ribbon to tie some together like this one:

I ran ribbon through each hole on the Christmas banner (see pic below) and I used brads to connect the rest (see pics above!). The brads were definitely easier and I was able to color coordinate my brads with my banners, so I like that too!
I did tie ribbons in the first and last hole of each banner so I can display them. I think you can see that in any of the pics.
Then I was asked if they were easy to store.
The Christmas banner folds up really easily since it's put together with ribbon...

The ones I assembled with brads fold together in a funky sort of way...

But I have them each placed in a baggie and they are nice and flat and will store nicely, I think!

Last, I was asked how to print these in different sizes so I've put together a picture tutorial to walk you through it. You can't "customize" a desired size, but you can print multiple copies on a page to make them smaller if you want. Maybe you already knew this... but if not, it's a neat trick that works with any PDF. I use it often to do things like make 8.5"x11" charts into flashcard sized reminders for my kiddos! Here's how:


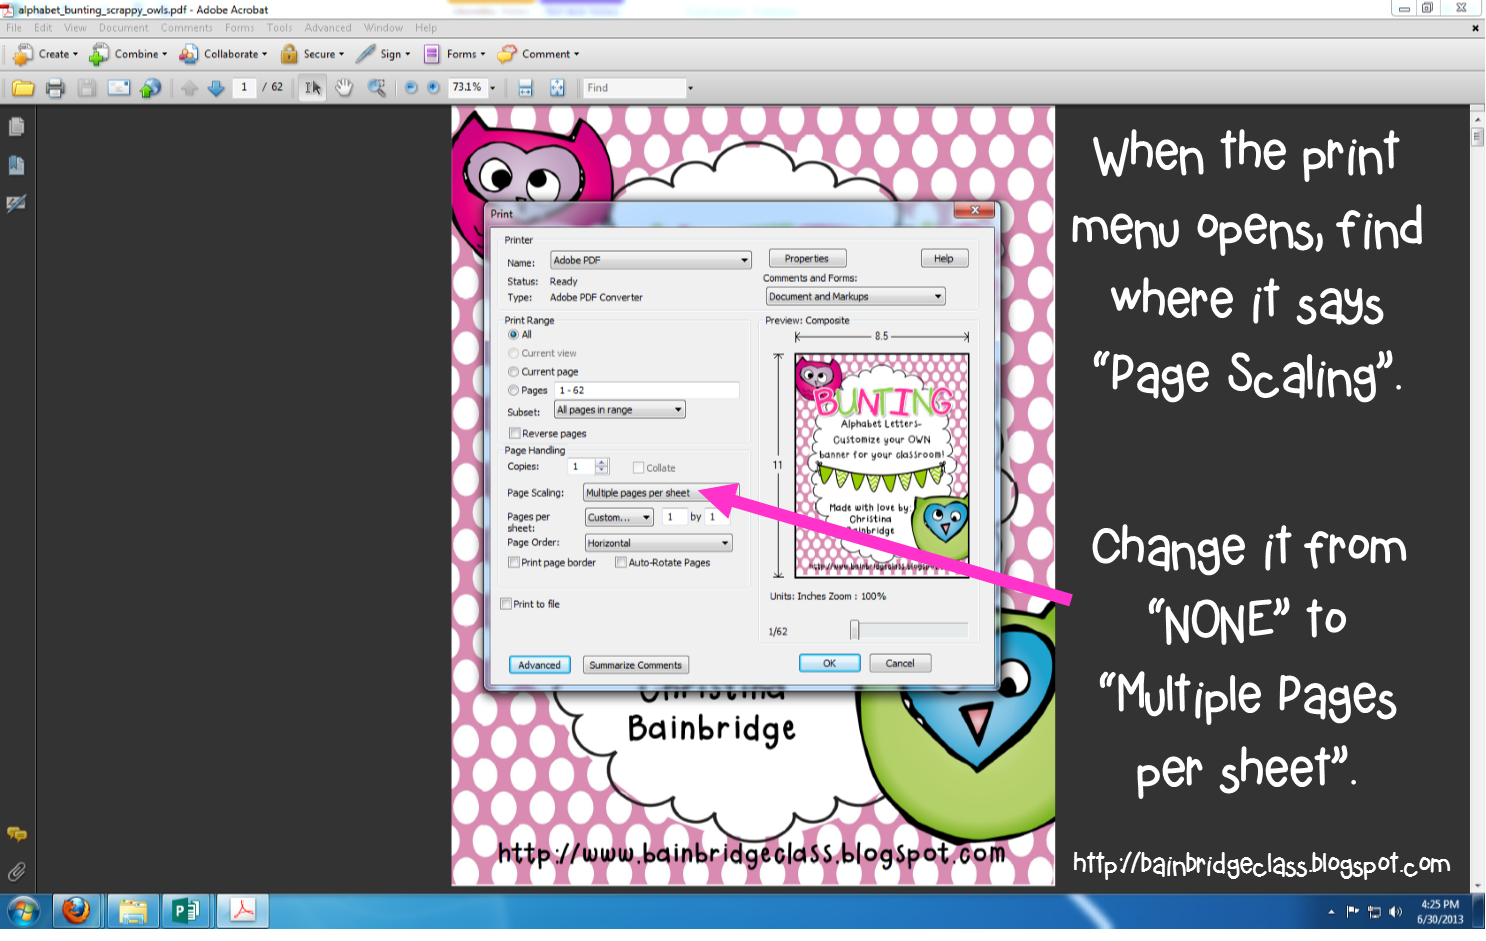

Hope that helps and you learned something new today!
I have almost FIFTY different themed bunting sets! Check out the link below to see if there's something cute for your theme... and, if not, let me know and I'll add it right away!

Also, did I mention earlier that I joined Instagram? I'm still figuring it out, but if you want to follow me, my username is mrsbainbridges_blog and you can take a little peek into my life if you're interested! I'd love to follow you too!
I have almost FIFTY different themed bunting sets! Check out the link below to see if there's something cute for your theme... and, if not, let me know and I'll add it right away!
Also, did I mention earlier that I joined Instagram? I'm still figuring it out, but if you want to follow me, my username is mrsbainbridges_blog and you can take a little peek into my life if you're interested! I'd love to follow you too!


